Chess: Understanding the Spanish Four Knights
1 e4 e5 2 Nf3 Nc6 3 Nc3 Nf6 4 Bb5 Line

What's the game plan for White?
* Apply pressure on the center, beginning
with the move 4 Bb5.
* Implement an appropriate plan in response
to each of the various options available to
Black at move 4.
What's the game plan for Black?

Option 1: Black prompts an immediate clash
with 4 ... Bc5.
White responds by executing a combination
based on a fork.
Option 2: Black sacrifices a pawn by
4 ... Nd4 so as to speedily mobilize his pieces.
White accepts the sacrifice and attempts
to defend and hold on to the extra pawn.
Option 3: Black opts for a protracted
positional struggle by 4 ... Bb4.
White also responds with positional play,
while keeping in mind the possibility of firing
things up with a timely f2-f4 breakthrough.
1 e4

Opening up a diagonal for the King's bishop and Queen,
plus assailing the d5 and f5 squares.
1 ... e5

Black copies White with the same idea in mind.
2 Nf3

Please note how this move not only brings
the knight closer to the center of operations
but also attacks Black's e5 pawn. If possible,
always develop with attack. It speeds up
development and harasses the enemy.
2 ... Nc6

The knight comes out to defend the e5 pawn.
3 Nc3

3 ... Nf6

Since the knights are slow-stepping pieces
that work best away from the back ranks
and side files, they are promptly developed
towards the center, where they can maximize
their powers.
4 Bb5

White places his bishop on a square where it apparently
threatens to win a pawn by 5 Bxc6, followed by 6 Nxe5.
Simultaneously, he clears the way for kingside castling.
Option 1: 1 e4 e5 2 Nf3 Nc6 3 Nc3 Nf6 4 Bb5 Bc5

After 4 ... a6 5 Bxc6 dxc6 6 Nxe5 Nxe4 7 Nxe4 Qd4
8 0-0 Qxe5 9 d4 Qf5 10 Re1, White gets the upperhand.
Although 4... Bd6 looks unsightly, it is actually a
playable move. Black gets an okay position after
castling, Rf8-e8, Bd6-f8, followed by advancing the
d7-pawn.
4 ... d6
4 ... Be7
5 0-0

White cannot gain a pawn by 5 Bxc6 dxc6 6 Nxe5
because Black has 6 ... Bxf2+ 7 Kxf2 Qd4+,
winning the pawn back with a better position.
5 Bxc6
5 Nxe5
5 ... 0-0

5 ... d6 would be an error because it puts the
c6 knight in a pin; thereafter, White can
advance 6 d4.
5 ... Qe7
5 ... d6
6 Nxe5

White tries to gain the initiative through this engaging
temporary sacrifice. After 6 Bxc6 dxc6 7 Nxe5, Black
gets the pawn back by 7 ... Re8 8 Nf3 (or 8 Nd3 Bg4
9 Qe1 Bd4 and White cannot secure the e4-pawn)
8 ... Nxe4.
6 d3
6 ... Nxe5

6 ... Re8
6 ... Nd4
6 ... Bd4
7 d4

7 ... Bd6

Trying to save the bishop pair.
7 ... Bb4
8 f4

More inspired than the immediate recapture
with 8 dxe5.
8 dxe5
8 Re1
8 ... Nc6

Following 8 ... Neg4 9 e5 Bb4 10 exf6 Nxf6 11 f5,
White has an active position.
8 ... Neg4
9 e5

The forks keep coming!
9 ... Be7

9 ... a6
9 ... Bb4
10 d5

Again postponing to recapture the f6 knight.
White is advancing further to attain a
space advantage.
10 exf6
10 ... Nb4

10 ... Bc5+
11 exf6

11 d6
11 ... Bxf6

12 a3

12 Ne4
12 ... Bxc3

12 ... c6
13 bxc3

13 axb4
13 ... Nxd5
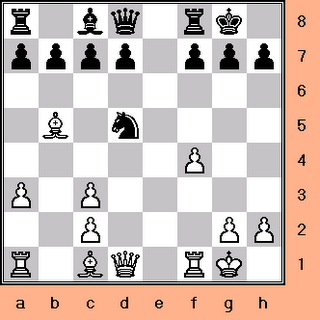
13 ... c6
14 Qxd5

14 ... c6

15 Qd3
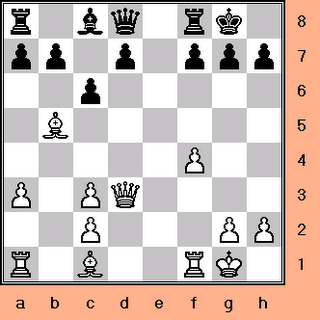
15 Qd4
15 ... cxb5

15 ... Qb6+
16 f5

16 ... f6

Black gets too many weak dark squares on the
kingside after 16 ... Re8 17 f6 g6
17 a4

17 Qxb5
17 Qd5+
17 Rb1
17 ... bxa4

18 Rxa4

And White gets good compensation thanks to
the superior development and activity of
his pieces. The White rook can swing over
to the kingside to aid the Queen in an
attack and the bishop can viably exploit
the dark squares.
18 Be3
18 Qd5+
Option 2: 1 e4 e5 2 Nf3 Nc6 3 Nc3 Nf6 4 Bb5 Nd4

Initiating the line that involves a pawn sacrifice.
5 Ba4

Nothing much is to be gained from 5 Nxd4 exd4
6 e5 dxc3 7 exf6 Qxf6 8 dxc3 Qe5+ 9 Qe2.
The endgame looks drawish.
5 Nxd4
5 Bc4
5 O-O
5 Nxe5
5 Bd3
5 Be2
5 ... Bc5
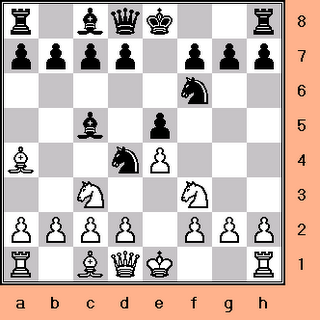
5 ... Nxf3+ would be a premature resignation of the
central fight in light of 6 Qxf3 c6 (if 6 ... Be7
7 Qg3 is unpleasant) 7 0-0 d6 8 d3, and White has
a good position. After 8 ... Be7, 9 Nd5 is plausible
because of the pin. Otherwise, after Black castles,
the basic plan is to reposition the knight to f5
(Nc3-e2-g3-f5).
5 ... c6
5 ... Nxf3+
6 Nxe5

6 d3
6 O-O
6 ... 0-0

Black can get his pawn back with 6 ... Qe7 7 Nd3 Nxe4,
but, following 8 0-0 Nxc3 9 dxc3 Ne6 10 Nxc5 Qxc5
11 Be3, White is better, thanks to the bishop pair
advantage.
6 ... Qe7
7 Nd3

The natural 7 d3 gives Black the initiative: 7 ... d6
8 Nf3 Bg4, pinning the knight.
7 d3
7 Nf3
7 0-0
7 ... Bb6
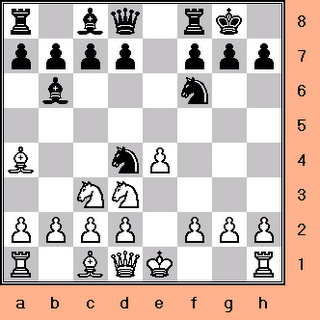
7 ... d6
7 ... Be7
8 e5
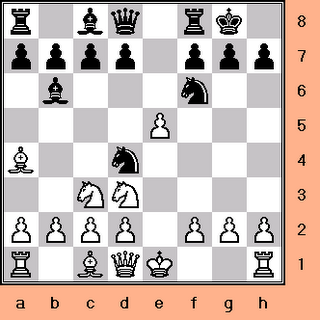
Black is assured of a great game if White plays the
normal 8 0-0: 8 ... d5! 9 e5 Bg4 10 Qe1 (White cannot
block with f3 because of the discovered check)
10 ... Ne4 11 Nxe4 Ne2+ 12 Kh1 dxe4, and Black is
better. Or, 9 Nxd5 Nxd5 10 exd5 Qxd5 11 Nf4 Qg5
12 d3 Bg4, with a strong attack for Black.
8 Nf4
8 f3
8 ... Ne8

8 ... Qe7
9 Nd5

A powerful attack ensues after 9 0-0 d6 10 exd6 Nf6
11 dxc7 Qd6.
9 O-O
9 ... d6

Or, 9 ... c6 10 Ne3 d5 11 c3 Ne6 12 Bc2 d4, and Black
has adequate compensation for the pawn.
9 ... c6
9 ... Qg5
10 Ne3

After 10 0-0 dxe5 11 Nxb6 axb6, the a4 bishop
is hanging.
10 c3
10 exd6
10 ... Qg5

10 ... c6
10 ... dxe5
10 ... c5
10 ... Qe7
10 ... Qh4
11 exd6

11 f4
11 ... Nxd6

With compensation for the pawn. Black's pieces are
active and White is lagging behind in development.
11 ... c6
Option 3: 1 e4 e5 2 Nf3 Nc6 3 Nc3 Nf6 4 Bb5 Bb4

5 0-0

5 Nd5 Nxd5 6 exd5 e4 7 dxc6 dxc6 8 Be2 exf3
9 Bxf3 0-0 10 0-0 leads to an equal position.
5 d3
5 Nd5
5 Bxc6
5 ... 0-0

5 ... Bxc3
5 ... d6
6 d3

6 Bxc6
6 Nd5
6 Re1
6 ... d6
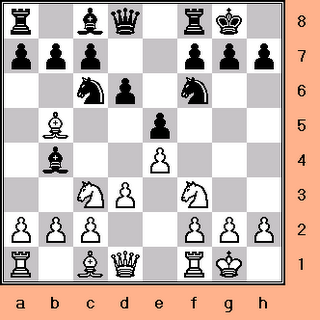
6 ... Bxc3
6 ... Re8
6 ... Ne7
6 ... d5
6 ... Nd4
7 Bg5

7 Ne2
7 Bxc6
7 h3
7 ... Bxc3

If Black continues to imitate White with 7 ... Bg4,
then 8 Nd5 Nd4 9 Nxb4 Nxb5 10 Nd5 Nd4 11 Bxf6
11 ... gxf6 12 Qd2 Nxf3+ (12 ... Bxf3 13 Qh6)
13 gxf3 Bxf3 14 Qe3 Bh5? 15 Qh6 Bg6 16 f4 c6
17 fxe5 fxe5 18 Nf6+ Kh8 19 h4, and he cannot
avoid material loss.
7 ... Bg4
7 ... Ne7
8 bxc3

8 ... Qe7

8 ... h6
8 ... Bd7
8 ... Ne7
8 ... a6
9 Re1
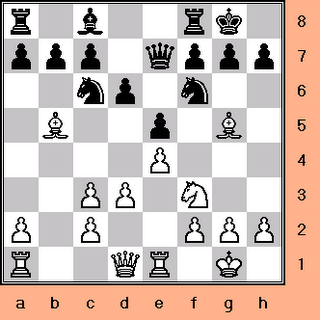
9 Bxc6
9 Nd2
9 Qe2
9 Qd2
9 ... Nd8

9 ... h6
9 ... Bd7
9 ... Bg4
9 ... a6
10 d4

10 Bh4
10 Bc4
10 ... Ne6

10 ... Bg4
10 ... c6
11 Bc1

Black's pawn structure is superior following
11 dxe5 Nxg5 12 exf6 Qxf6. 11 Bh4 Nf4 is also
in his favor.
11 Bh4
11 Bd2
11 ... c6

11 ... Rd8
11 ... c5
12 Bf1

12 Bc4
12 Bd3
12 ... Qc7

With an equal position. Here White can opt for
a belligerent approach as in the main variation,
or, the safer 13 g3 and 14 Bg2 with a delayed
f2-f4 scheme.
12 ... Rd8
12 ... Nc7
13 Nh4

The idea is d2-g3 and f2-f4 so as to fight for the center
immediately and advance on the kingside.
13 g3
13 Qd3
13 Rb1
13 ... Re8

13 ... Rd8
14 g3
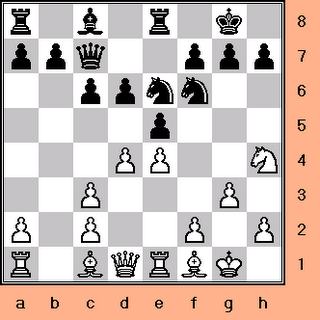
14 Nf5
14 Rb1
14 ... h6

14 ... Nf8
15 f4

15 ... Qa5

Each side now has about equal chances in the ensuing complications.
15 ... exf4
15 ... Rb8
By ChessCoach@care2.com

What's the game plan for White?
* Apply pressure on the center, beginning
with the move 4 Bb5.
* Implement an appropriate plan in response
to each of the various options available to
Black at move 4.
What's the game plan for Black?

Option 1: Black prompts an immediate clash
with 4 ... Bc5.
White responds by executing a combination
based on a fork.
Option 2: Black sacrifices a pawn by
4 ... Nd4 so as to speedily mobilize his pieces.
White accepts the sacrifice and attempts
to defend and hold on to the extra pawn.
Option 3: Black opts for a protracted
positional struggle by 4 ... Bb4.
White also responds with positional play,
while keeping in mind the possibility of firing
things up with a timely f2-f4 breakthrough.
1 e4

Opening up a diagonal for the King's bishop and Queen,
plus assailing the d5 and f5 squares.
1 ... e5

Black copies White with the same idea in mind.
2 Nf3

Please note how this move not only brings
the knight closer to the center of operations
but also attacks Black's e5 pawn. If possible,
always develop with attack. It speeds up
development and harasses the enemy.
2 ... Nc6

The knight comes out to defend the e5 pawn.
3 Nc3

3 ... Nf6

Since the knights are slow-stepping pieces
that work best away from the back ranks
and side files, they are promptly developed
towards the center, where they can maximize
their powers.
4 Bb5

White places his bishop on a square where it apparently
threatens to win a pawn by 5 Bxc6, followed by 6 Nxe5.
Simultaneously, he clears the way for kingside castling.
Option 1: 1 e4 e5 2 Nf3 Nc6 3 Nc3 Nf6 4 Bb5 Bc5

After 4 ... a6 5 Bxc6 dxc6 6 Nxe5 Nxe4 7 Nxe4 Qd4
8 0-0 Qxe5 9 d4 Qf5 10 Re1, White gets the upperhand.
Although 4... Bd6 looks unsightly, it is actually a
playable move. Black gets an okay position after
castling, Rf8-e8, Bd6-f8, followed by advancing the
d7-pawn.
4 ... d6
4 ... Be7
5 0-0

White cannot gain a pawn by 5 Bxc6 dxc6 6 Nxe5
because Black has 6 ... Bxf2+ 7 Kxf2 Qd4+,
winning the pawn back with a better position.
5 Bxc6
5 Nxe5
5 ... 0-0

5 ... d6 would be an error because it puts the
c6 knight in a pin; thereafter, White can
advance 6 d4.
5 ... Qe7
5 ... d6
6 Nxe5

White tries to gain the initiative through this engaging
temporary sacrifice. After 6 Bxc6 dxc6 7 Nxe5, Black
gets the pawn back by 7 ... Re8 8 Nf3 (or 8 Nd3 Bg4
9 Qe1 Bd4 and White cannot secure the e4-pawn)
8 ... Nxe4.
6 d3
6 ... Nxe5

6 ... Re8
6 ... Nd4
6 ... Bd4
7 d4

7 ... Bd6

Trying to save the bishop pair.
7 ... Bb4
8 f4

More inspired than the immediate recapture
with 8 dxe5.
8 dxe5
8 Re1
8 ... Nc6

Following 8 ... Neg4 9 e5 Bb4 10 exf6 Nxf6 11 f5,
White has an active position.
8 ... Neg4
9 e5

The forks keep coming!
9 ... Be7

9 ... a6
9 ... Bb4
10 d5

Again postponing to recapture the f6 knight.
White is advancing further to attain a
space advantage.
10 exf6
10 ... Nb4

10 ... Bc5+
11 exf6

11 d6
11 ... Bxf6

12 a3

12 Ne4
12 ... Bxc3

12 ... c6
13 bxc3

13 axb4
13 ... Nxd5

13 ... c6
14 Qxd5

14 ... c6

15 Qd3

15 Qd4
15 ... cxb5

15 ... Qb6+
16 f5

16 ... f6

Black gets too many weak dark squares on the
kingside after 16 ... Re8 17 f6 g6
17 a4

17 Qxb5
17 Qd5+
17 Rb1
17 ... bxa4

18 Rxa4

And White gets good compensation thanks to
the superior development and activity of
his pieces. The White rook can swing over
to the kingside to aid the Queen in an
attack and the bishop can viably exploit
the dark squares.
18 Be3
18 Qd5+
Option 2: 1 e4 e5 2 Nf3 Nc6 3 Nc3 Nf6 4 Bb5 Nd4

Initiating the line that involves a pawn sacrifice.
5 Ba4

Nothing much is to be gained from 5 Nxd4 exd4
6 e5 dxc3 7 exf6 Qxf6 8 dxc3 Qe5+ 9 Qe2.
The endgame looks drawish.
5 Nxd4
5 Bc4
5 O-O
5 Nxe5
5 Bd3
5 Be2
5 ... Bc5

5 ... Nxf3+ would be a premature resignation of the
central fight in light of 6 Qxf3 c6 (if 6 ... Be7
7 Qg3 is unpleasant) 7 0-0 d6 8 d3, and White has
a good position. After 8 ... Be7, 9 Nd5 is plausible
because of the pin. Otherwise, after Black castles,
the basic plan is to reposition the knight to f5
(Nc3-e2-g3-f5).
5 ... c6
5 ... Nxf3+
6 Nxe5

6 d3
6 O-O
6 ... 0-0

Black can get his pawn back with 6 ... Qe7 7 Nd3 Nxe4,
but, following 8 0-0 Nxc3 9 dxc3 Ne6 10 Nxc5 Qxc5
11 Be3, White is better, thanks to the bishop pair
advantage.
6 ... Qe7
7 Nd3

The natural 7 d3 gives Black the initiative: 7 ... d6
8 Nf3 Bg4, pinning the knight.
7 d3
7 Nf3
7 0-0
7 ... Bb6

7 ... d6
7 ... Be7
8 e5

Black is assured of a great game if White plays the
normal 8 0-0: 8 ... d5! 9 e5 Bg4 10 Qe1 (White cannot
block with f3 because of the discovered check)
10 ... Ne4 11 Nxe4 Ne2+ 12 Kh1 dxe4, and Black is
better. Or, 9 Nxd5 Nxd5 10 exd5 Qxd5 11 Nf4 Qg5
12 d3 Bg4, with a strong attack for Black.
8 Nf4
8 f3
8 ... Ne8

8 ... Qe7
9 Nd5

A powerful attack ensues after 9 0-0 d6 10 exd6 Nf6
11 dxc7 Qd6.
9 O-O
9 ... d6

Or, 9 ... c6 10 Ne3 d5 11 c3 Ne6 12 Bc2 d4, and Black
has adequate compensation for the pawn.
9 ... c6
9 ... Qg5
10 Ne3

After 10 0-0 dxe5 11 Nxb6 axb6, the a4 bishop
is hanging.
10 c3
10 exd6
10 ... Qg5

10 ... c6
10 ... dxe5
10 ... c5
10 ... Qe7
10 ... Qh4
11 exd6

11 f4
11 ... Nxd6

With compensation for the pawn. Black's pieces are
active and White is lagging behind in development.
11 ... c6
Option 3: 1 e4 e5 2 Nf3 Nc6 3 Nc3 Nf6 4 Bb5 Bb4

5 0-0

5 Nd5 Nxd5 6 exd5 e4 7 dxc6 dxc6 8 Be2 exf3
9 Bxf3 0-0 10 0-0 leads to an equal position.
5 d3
5 Nd5
5 Bxc6
5 ... 0-0

5 ... Bxc3
5 ... d6
6 d3

6 Bxc6
6 Nd5
6 Re1
6 ... d6

6 ... Bxc3
6 ... Re8
6 ... Ne7
6 ... d5
6 ... Nd4
7 Bg5

7 Ne2
7 Bxc6
7 h3
7 ... Bxc3

If Black continues to imitate White with 7 ... Bg4,
then 8 Nd5 Nd4 9 Nxb4 Nxb5 10 Nd5 Nd4 11 Bxf6
11 ... gxf6 12 Qd2 Nxf3+ (12 ... Bxf3 13 Qh6)
13 gxf3 Bxf3 14 Qe3 Bh5? 15 Qh6 Bg6 16 f4 c6
17 fxe5 fxe5 18 Nf6+ Kh8 19 h4, and he cannot
avoid material loss.
7 ... Bg4
7 ... Ne7
8 bxc3

8 ... Qe7

8 ... h6
8 ... Bd7
8 ... Ne7
8 ... a6
9 Re1

9 Bxc6
9 Nd2
9 Qe2
9 Qd2
9 ... Nd8

9 ... h6
9 ... Bd7
9 ... Bg4
9 ... a6
10 d4

10 Bh4
10 Bc4
10 ... Ne6

10 ... Bg4
10 ... c6
11 Bc1

Black's pawn structure is superior following
11 dxe5 Nxg5 12 exf6 Qxf6. 11 Bh4 Nf4 is also
in his favor.
11 Bh4
11 Bd2
11 ... c6

11 ... Rd8
11 ... c5
12 Bf1

12 Bc4
12 Bd3
12 ... Qc7

With an equal position. Here White can opt for
a belligerent approach as in the main variation,
or, the safer 13 g3 and 14 Bg2 with a delayed
f2-f4 scheme.
12 ... Rd8
12 ... Nc7
13 Nh4

The idea is d2-g3 and f2-f4 so as to fight for the center
immediately and advance on the kingside.
13 g3
13 Qd3
13 Rb1
13 ... Re8

13 ... Rd8
14 g3

14 Nf5
14 Rb1
14 ... h6

14 ... Nf8
15 f4

15 ... Qa5

Each side now has about equal chances in the ensuing complications.
15 ... exf4
15 ... Rb8
By ChessCoach@care2.com

1 Comments:
Your readers may also enjoy my two pieces on the Spanish Four Knights: Sutovsky's Anti-Rubinstein 5.O-O and The Spanish Four Knights, Part Two.
Post a Comment
<< Home