Chess: Understanding the Closed Ruy Lopez Part I
1 e4 e5 2 Nf3 Nc6 3 Bb5 a6 4 Ba4 Nf6 5 0-0 Be7
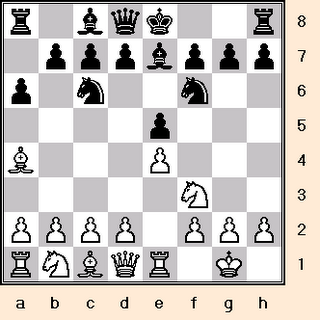
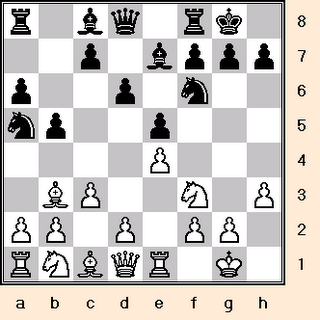
6 Re1 b5 7 Bb3 d6 8 c3 0-0 9 h3 Na5 10 Bc2 c5
11 d4 Qc7 12 Nbd2 Line

What's the game plan for White and Black?
The Closed Ruy Lopez is fraught with tension
that may be resolved in divers ways. Below is a
sample of objectives for both White and Black.
(A) White locks the center with d5.
This advance enables pawn storming on both
wings by either side. Usually, White assails
on the kingside.
(B) White exchanges pawns with dxe5/dxc5.
Despite this simplification of affairs, he still
retains attacking opportunities against the
enemy King. Maneuvering toward and occu-
pying d5 usually augments those possibilities.
(C) Black opens up the c-file (... cxd4) so as to
pressurize it.
(D) Black liquidates the center through ... d5.
Also available:
Understanding the Ruy Lopez (Open Variation)
http://chesscoach1950.blogspot.com/2006/05/chess-understanding-ruy-lopez-open.html
Chess: Understanding the Closed Ruy Lopez
(Flohr-Zaitsev Variation)
http://chesscoach1950.blogspot.com/2006/08/chess-understanding-closed-ruy-lopez.html
Chess: Understanding the Ruy Lopez
(Schliemann Defense)
http://chesscoach1950.blogspot.com/2006/08/chess-understanding-ruy-lopez.html
1 e4

Opening up a diagonal for the Queen and f1 bishop,
and, attacking the d5 and f5 squares.
1 ... e5

Black copies White with the same idea in mind.
2 Nf3
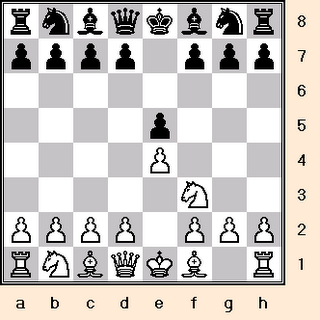
Not merely bringing the knight nearer the
center of operations but also assailing Black's
e5 pawn. If possible, always develop with attack
so as to speed up mobilization and harass the
enemy.
2 ... Nc6

The knight comes out to protect the threatened pawn.
3 Bb5

Inaugurating the Ruy Lopez. White indirectly
attacks Black's e5 pawn by threatening to
remove its defender (Bxc6). Moreover, he
prepares for a rapid kingside castling and
dissuades the advancement of the d7 pawn
because of the prospective pin on the knight.
3 ... a6
So that, when the bishop retreats to a4, he can hold in
reserve the possibility of driving it back altogether by
... b5.
3 ... Nf6
3 ... f5
3 ... g6
3 ... Bc5
3 ... Nd4
3 ... Nge7
3 ... d6
3 ... Bb4
3 ... Be7
3 ... a5
3 ... Qe7
3 ... Qf6
3 ... Nb8
3 ... Na5
3 ... Bd6
3 ... f6
3 ... Nce7
3 ... a6 (Open Ruy Lopez Part I)
3 ... a6 (Open Ruy Lopez Part II)
3 ... a6 (Marshall Gambit)
3 ... d5? 4 Nxe5 Qg5 5 Nf3 Qe7 6 e5.
3 ... g5? 4 d4 Nxd4 5 Nxd4 exd4 6 Qxd4 Qf6
7 e5 Qe7 8 O-O c6.
4 Ba4

4 Bc4
4 Bxc6
4 Be2
4 Bd3
White cannot as yet win the e5 pawn by 4 Bxc6 dxc6
5 Nxe5 because of 5 ... Qd4, doubly attacking
White's e5 knight and e4 pawn. Consequently, White
retires his bishop to a4, and waits for a more
propitious moment to effect the exchange.
4 ... Nf6
Developing the knight and counter-attacking White's
e4 pawn.
4 ... d6
4 ... b5
4 ... f5
4 ... Nge7
4 ... g6
4 ... Be7
4 ... Bc5
4 ... Qf6
4 ... Nd4
4 ... g5
4 ... f6
4 ... Bb4
5 0-0
White, however, can also ignore this attack.
5 Qe2
5 d3
5 d4
5 Nc3
5 Bxc6
5 c3
5 ... Be7

5 ... Nxe4
5 ... b5
5 ... Bc5
5 ... d6
5 ... Bd6
6 Re1
White now threatens to play 7 Bxc6 dxc6 8 Nxe5,
when 8 ... Qd4 will no longer work because of
9 Nf3.
6 Bxc6
6 Qe2
6 d3
6 d4
6 Nc3
6 c3
6 c4
6 ... b5
Eliminating the aforementioned threat.
6 ... d6
6 ... O-O
6 ... Bc5
7 Bb3

Moving out of harm's way.
7 ... d6
Protecting the e5 pawn, which is an important piece in maintaining Black's central position, and, opening up a
diagonal for the c8 bishop.
7 ... O-O
7 ... Bb7
8 c3

Preparing to build up a pawn center by d4 and giving
the b3 bishop a square of retreat on c2.
8 a4
8 h3
8 a3
8 d4
8 Nc3
8 d3
8 Bd5
8 ... 0-0
Black prudently removes his King from the center.
Not commendable is 8 ... Bg4 because of 9 d3, when
White will eventually win a tempo with the maneuver
Ncd2-f1-e3/g3 followed by h3. Inferior is 9 h3 Bh5
10 d3 Qd7, when Black may strike at the pawn on h3.
8 ... Na5
8 ... Bg4
8 ... Nb8
9 h3

Preventing 9 ... Bg4, which is what Black would do if
White played 9 d4 at once.
9 d4
9 d3
9 a4
9 a3
9 Bc2
9 ... Na5
Whilst it's not normally recommended to post
a knight on the rook file (where its field of
action is halved) here the move is part of a
scheme of counter-attack on the queenside.
In this main line of the Ruy Lopez the plans
of campaign for White and Black are clearly
contrasted: White tries to gain control of the
center and inaugurate a kingside attack,
whereas Black attempts to maintain his own
central position whilst counter-attacking
on the queenside.
9 ... Bb7
9 ... Nb8
9 ... Nd7
9 ... h6
9 ... Re8
9 ... Be6
9 ... a5
9 ... Qd7
9 ... Bd7
9 ... Kh8
9 ... d5
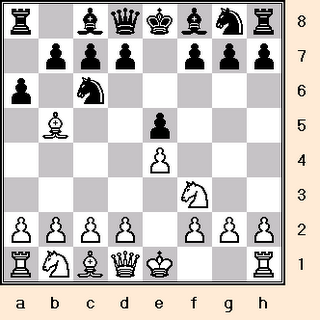
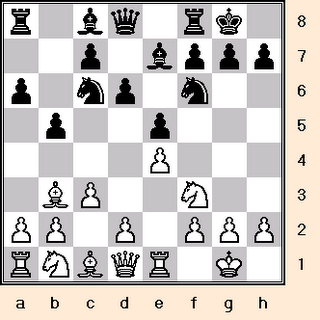
10 Bc2

Presently this bishop looks inoffensive, but White
always has ambitions of an attack along the b1-h7
diagonal.
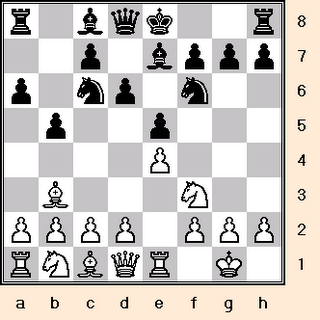
10 ... c5
Black advances on the queenside as per plan.
10 ... Bb7
10 ... c6
10 ... Nd7
10 ... Be6
10 ... Nc4
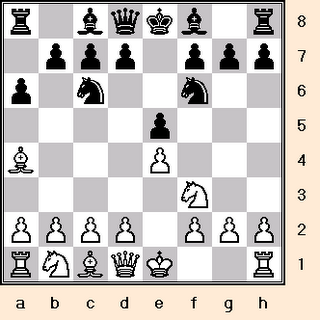
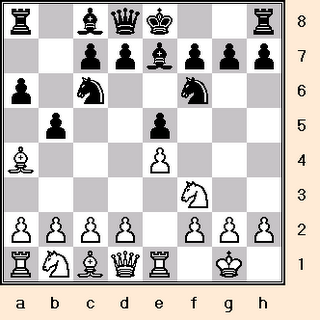
11 d4

Staking a claim in the center and threatening the e5
pawn by 12 dxe5 dxe5 13 Nxe5.
11 d3
11 a4
11 ... Qc7

Thus, Black maintains his center pawn on e5.
Also, when and if the c-file becomes open, the Queen
can work with a rook on c8 to exert pressure down the
open pathway.
11 ... Nd7
11 ... Bb7
11 ... Nc6
11 ... cxd4
11 ... Re8
11 ... exd4
11 ... d5
11 ... Bd7
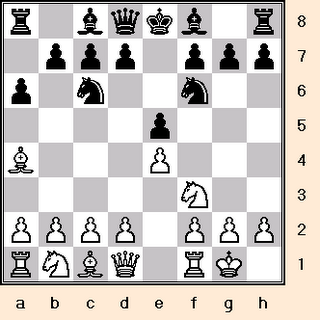
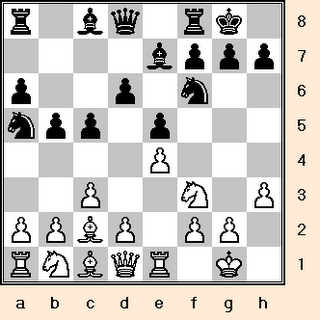
12 Nbd2
This knight will be brought over to the kingside to
reinforce White's attack (Nb1-d2-f1-g3-f5/h5).
12 d5
12 b4
12 a4
12 Bg5
12 b3
12 dxe5
12 a3
By ChessCoach@care2.com
6 Re1 b5 7 Bb3 d6 8 c3 0-0 9 h3 Na5 10 Bc2 c5
11 d4 Qc7 12 Nbd2 Line
What's the game plan for White and Black?
The Closed Ruy Lopez is fraught with tension
that may be resolved in divers ways. Below is a
sample of objectives for both White and Black.
(A) White locks the center with d5.
This advance enables pawn storming on both
wings by either side. Usually, White assails
on the kingside.
(B) White exchanges pawns with dxe5/dxc5.
Despite this simplification of affairs, he still
retains attacking opportunities against the
enemy King. Maneuvering toward and occu-
pying d5 usually augments those possibilities.
(C) Black opens up the c-file (... cxd4) so as to
pressurize it.
(D) Black liquidates the center through ... d5.
Also available:
Understanding the Ruy Lopez (Open Variation)
http://chesscoach1950.blogspot.com/2006/05/chess-understanding-ruy-lopez-open.html
Chess: Understanding the Closed Ruy Lopez
(Flohr-Zaitsev Variation)
http://chesscoach1950.blogspot.com/2006/08/chess-understanding-closed-ruy-lopez.html
Chess: Understanding the Ruy Lopez
(Schliemann Defense)
http://chesscoach1950.blogspot.com/2006/08/chess-understanding-ruy-lopez.html
1 e4
Opening up a diagonal for the Queen and f1 bishop,
and, attacking the d5 and f5 squares.
1 ... e5
Black copies White with the same idea in mind.
2 Nf3
Not merely bringing the knight nearer the
center of operations but also assailing Black's
e5 pawn. If possible, always develop with attack
so as to speed up mobilization and harass the
enemy.
2 ... Nc6
The knight comes out to protect the threatened pawn.
3 Bb5

Inaugurating the Ruy Lopez. White indirectly
attacks Black's e5 pawn by threatening to
remove its defender (Bxc6). Moreover, he
prepares for a rapid kingside castling and
dissuades the advancement of the d7 pawn
because of the prospective pin on the knight.
3 ... a6
So that, when the bishop retreats to a4, he can hold in
reserve the possibility of driving it back altogether by
... b5.
3 ... Nf6
3 ... f5
3 ... g6
3 ... Bc5
3 ... Nd4
3 ... Nge7
3 ... d6
3 ... Bb4
3 ... Be7
3 ... a5
3 ... Qe7
3 ... Qf6
3 ... Nb8
3 ... Na5
3 ... Bd6
3 ... f6
3 ... Nce7
3 ... a6 (Open Ruy Lopez Part I)
3 ... a6 (Open Ruy Lopez Part II)
3 ... a6 (Marshall Gambit)
3 ... d5? 4 Nxe5 Qg5 5 Nf3 Qe7 6 e5.
3 ... g5? 4 d4 Nxd4 5 Nxd4 exd4 6 Qxd4 Qf6
7 e5 Qe7 8 O-O c6.
4 Ba4

4 Bc4
4 Bxc6
4 Be2
4 Bd3
White cannot as yet win the e5 pawn by 4 Bxc6 dxc6
5 Nxe5 because of 5 ... Qd4, doubly attacking
White's e5 knight and e4 pawn. Consequently, White
retires his bishop to a4, and waits for a more
propitious moment to effect the exchange.
4 ... Nf6
Developing the knight and counter-attacking White's
e4 pawn.
4 ... d6
4 ... b5
4 ... f5
4 ... Nge7
4 ... g6
4 ... Be7
4 ... Bc5
4 ... Qf6
4 ... Nd4
4 ... g5
4 ... f6
4 ... Bb4
5 0-0
White, however, can also ignore this attack.
5 Qe2
5 d3
5 d4
5 Nc3
5 Bxc6
5 c3
5 ... Be7
5 ... Nxe4
5 ... b5
5 ... Bc5
5 ... d6
5 ... Bd6
6 Re1
White now threatens to play 7 Bxc6 dxc6 8 Nxe5,
when 8 ... Qd4 will no longer work because of
9 Nf3.
6 Bxc6
6 Qe2
6 d3
6 d4
6 Nc3
6 c3
6 c4
6 ... b5

Eliminating the aforementioned threat.
6 ... d6
6 ... O-O
6 ... Bc5
7 Bb3
Moving out of harm's way.
7 ... d6
Protecting the e5 pawn, which is an important piece in maintaining Black's central position, and, opening up a
diagonal for the c8 bishop.
7 ... O-O
7 ... Bb7
8 c3
Preparing to build up a pawn center by d4 and giving
the b3 bishop a square of retreat on c2.
8 a4
8 h3
8 a3
8 d4
8 Nc3
8 d3
8 Bd5
8 ... 0-0

Black prudently removes his King from the center.
Not commendable is 8 ... Bg4 because of 9 d3, when
White will eventually win a tempo with the maneuver
Ncd2-f1-e3/g3 followed by h3. Inferior is 9 h3 Bh5
10 d3 Qd7, when Black may strike at the pawn on h3.
8 ... Na5
8 ... Bg4
8 ... Nb8
9 h3
Preventing 9 ... Bg4, which is what Black would do if
White played 9 d4 at once.
9 d4
9 d3
9 a4
9 a3
9 Bc2
9 ... Na5
Whilst it's not normally recommended to post
a knight on the rook file (where its field of
action is halved) here the move is part of a
scheme of counter-attack on the queenside.
In this main line of the Ruy Lopez the plans
of campaign for White and Black are clearly
contrasted: White tries to gain control of the
center and inaugurate a kingside attack,
whereas Black attempts to maintain his own
central position whilst counter-attacking
on the queenside.
9 ... Bb7
9 ... Nb8
9 ... Nd7
9 ... h6
9 ... Re8
9 ... Be6
9 ... a5
9 ... Qd7
9 ... Bd7
9 ... Kh8
9 ... d5
10 Bc2
Presently this bishop looks inoffensive, but White
always has ambitions of an attack along the b1-h7
diagonal.
10 ... c5
Black advances on the queenside as per plan.
10 ... Bb7
10 ... c6
10 ... Nd7
10 ... Be6
10 ... Nc4
11 d4

Staking a claim in the center and threatening the e5
pawn by 12 dxe5 dxe5 13 Nxe5.
11 d3
11 a4
11 ... Qc7

Thus, Black maintains his center pawn on e5.
Also, when and if the c-file becomes open, the Queen
can work with a rook on c8 to exert pressure down the
open pathway.
11 ... Nd7
11 ... Bb7
11 ... Nc6
11 ... cxd4
11 ... Re8
11 ... exd4
11 ... d5
11 ... Bd7
12 Nbd2
This knight will be brought over to the kingside to
reinforce White's attack (Nb1-d2-f1-g3-f5/h5).
12 d5
12 b4
12 a4
12 Bg5
12 b3
12 dxe5
12 a3
By ChessCoach@care2.com
posted by ChessCoach1977 at 1:25 PM
![]()
![]()

0 Comments:
Post a Comment
<< Home