Chess: Understanding the Closed Ruy Lopez (Flohr-Zaitsev Variation)
1 e4 e5 2 Nf3 Nc6 3 Bb5 a6 4 Ba4 Nf6 5 O-O Be7
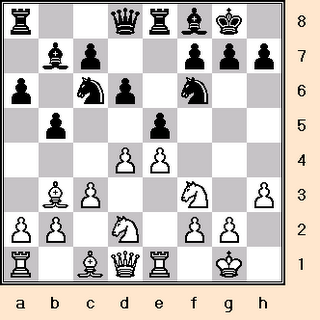
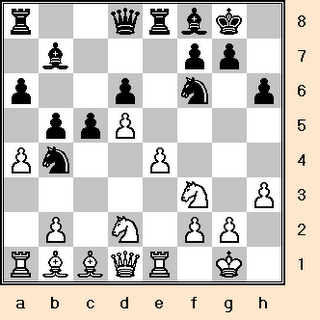
6 Re1 b5 7 Bb3 d6 8 c3 O-O 9 h3 Bb7 10 d4 Re8
11 Nbd2 Bf8 12 a4 h6 13 Bc2 exd4 14 cxd4 Nb4
15 Bb1 c5 16 d5 Nd7 17 Ra3 f5 Line

What's the game plan for Black?
Black aims to undermine e4 and also conduct
a queenside attack.
What's the game plan for White?
White intends to fortify e4 and also direct his
forces towards Black's kingside.
Also available:
Chess: Understanding the Closed Ruy Lopez
http://chesscoach1950.blogspot.com/2006/01/chess-understanding-closed-ruy-lopez.html.
Chess: Understanding the Ruy Lopez (Open Variation)
http://chesscoach1950.blogspot.com/2006/05/chess-understanding-ruy-lopez-open.html
Chess: Understanding the Ruy Lopez
(Schliemann Defense)
http://chesscoach1950.blogspot.com/2006/08/chess-understanding-ruy-lopez.html
1 e4

Opening up a diagonal for the Queen and f1 bishop, and,
attacking the d5 and f5 squares.
1 ... e5

Black copies White with the same idea in mind.
2 Nf3
Not merely bringing the knight nearer the
center of operations but also assailing Black's
e5 pawn. If possible, always develop with attack
so as to speed up mobilization and harass the
enemy.
2 ... Nc6

The knight comes out to protect the threatened pawn.
3 Bb5

Inaugurating the Ruy Lopez. White indirectly
attacks Black's e5 pawn by threatening to
remove its defender (Bxc6). Moreover, he
prepares for a rapid kingside castling and
dissuades the advancement of the d7 pawn
because of the prospective pin on the knight.
3 ... a6
So that, when the bishop retreats to a4, he can hold in
reserve the possibility of driving it back altogether by
... b5.
3 ... Nf6
3 ... f5
3 ... g6
3 ... Bc5
3 ... Nd4
3 ... Nge7
3 ... d6
3 ... Bb4
3 ... Be7
3 ... d5
3 ... a5
3 ... Qe7
3 ... Qf6
3 ... Nb8
3 ... Na5
3 ... g5
3 ... Bd6
3 ... f6
3 ... Nce7
3 ... a6 (Closed Ruy Lopez)
3 ... a6 (Open Ruy Lopez Part I)
3 ... a6 (Open Ruy Lopez Part II)
3 ... a6 (Marshall Gambit)
4 Ba4

4 Bc4
4 Be2
4 Bd3
4 Bxc6
White cannot as yet win the e5 pawn by 4 Bxc6 dxc6
5 Nxe5 because of 5 ... Qd4, doubly attacking
White's e5 knight and e4 pawn. Consequently, White
retires his bishop to a4, and waits for a more
propitious moment to effect the exchange.
4 ... Nf6
Developing the knight and counter-attacking White's
e4 pawn.
4 ... d6
4 ... b5
4 ... f5
4 ... Nge7
4 ... g6
4 ... Be7
4 ... Bc5
4 ... Qf6
4 ... Nd4
4 ... g5
4 ... f6
4 ... Bb4
5 0-0
White, however, can also ignore this attack.
5 Qe2
5 d4
5 d3
5 Nc3
5 Bxc6
5 c3
5 ... Be7

5 ... Nxe4
5 ... b5
5 ... Bc5
5 ... d6
5 ... Bd6
6 Re1
White now threatens to play 7 Bxc6 dxc6 8 Nxe5,
when 8 ... Qd4 will no longer work because of
9 Nf3.
6 Bxc6
6 Qe2
6 d3
6 d4
6 Nc3
6 c3
6 c4
6 ... b5
Eliminating the aforementioned threat.
6 ... d6
6 ... O-O
6 ... Bc5
7 Bb3

Moving out of harm's way.
7 ... d6
Protecting the e5 pawn, which is an important piece in
maintaining Black's central position, and, opening up a
diagonal for the c8 bishop.
7 ... O-O
7 ... Bb7
8 c3

Preparing to build up a pawn center by d4 and giving
the b3 bishop a square of retreat on c2.
8 a4
8 h3
8 a3
8 d4
8 Nc3
8 d3
8 Bd5
8 ... 0-0
Black prudently removes his King from the center
and places it in a safer position. Not commendable
is 8 ... Bg4 because of 9 d3, when White will
eventually win a tempo with the maneuver
Ncd2-f1-e3/g3 followed by h3. Inferior is
9 h3 Bh5 10 d3 Qd7, when Black may strike at the
pawn on h3.
8 ... Na5
8 ... Bg4
8 ... Nb8
9 h3

Preventing Bg4, which is what Black would do if
White played 9 d4 at once.
9 d4
9 d3
9 a4
9 a3
9 Bc2
9 ... Bb7

Inaugurating the Flohr-Zaitsev Variation
of the Closed Ruy Lopez. This fianchetto
hints at Black's design to undermine e4.
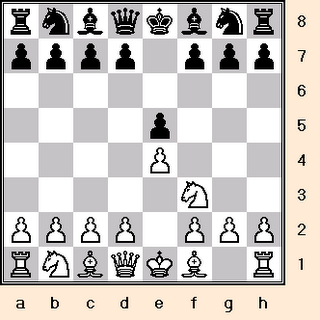
10 d4

(i) Facilitating the development of the
c1 bishop along the c1-h6 diagonal.
(ii) Vying for e5 and c5.
(iii) Reserving the possibility to lock
the center via d4-d5.
Although 10 d3 is not uncommon, it isn't
as assertive as the text.
10...Re8

Black continues to mind the e4 pawn in an indirect
manner.
Other moves to consider are:
10 ... Na5 11 Bc2 c5 12 Nbd2 cxd4 13 cxd4 Qc7 14 d5 Rac8
15 Bd3 Nd7 16 Nf1 f5.
(i) Open up the c-file in order to pressurize it
(12 ... cxd4, 13 ... Qc7, 14 ... Rac8).
(ii) Undermine the d5 pawn by attacking its e4 counterpart
(16 ... f5).
10 ... Nd7 11 Nbd2 Bf6 12 Nf1 Re8 13 Ng3 g6 14 Bh6 Na5
15 Bc2 c5 16 d5 Nc4 17 Qc1 Bg7 18 a4 Ncb6 19 a5 Nc8 20 c4 Bxh6 21 Qxh6.
(i) Artificially fianchetto the e7 bishop so as to beef up the kingside (10 ... Nd7, 11 ... Bf6, 13 ... g6, 17 ... Bg7).
(ii) Initiate queenside action
(14 ... Na5, 15 ... c5, 16 ... Nc4, 17 ... Ncb6)
(iii) Attack White's center by executing a timely ... f7-f5.
10 ... Qd7 11 Nbd2 Rad8 12 d5 Nb8 13 Nf1 c6 14 dxc6 Bxc6
15 Ng3 Qb7 16 Qe2 Nbd7 17 Bc2 Rfe8 18 Nf5 Bf8 19 Nh2 d5.
(i) Pressurize d5 and then aim for a d6-d5 break
(10 ... Qd7, 11 ... Rad8, 13 ... c6, 14 ... Bxc6, 15 ... Qb7,
19 ... d5)
(ii) Provide the e7 bishop with a retreat square on f8 (17 .... Rfe8).
10 ... h6 11 Nbd2 Re8 12 a4 Bf8 13 Bc2 exd4 14 cxd4 Nb4
15 Bb1 c5 16 d5 Nd7 17 Ra3 f5.
10 ... Nb8 11 dxe5 dxe5 12 Qxd8 Bxd8 13 Nxe5 Nxe4 14 Be3 Bf6
15 Ng4 Nd7 16 Nd2 Nxd2 17 Bxd2 Rfe8 18 Bf4.
10 ... Rc8 11 Nbd2 exd4 12 cxd4 Nb4 13 Qe2 c5 14 a3 Nc6 15 dxc5 dxc5 16 e5 Nd5.
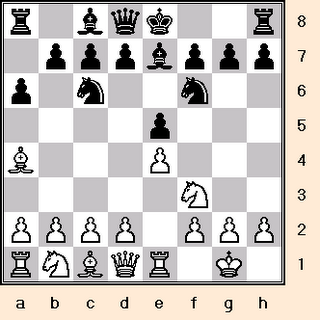
11 Nbd2

(i) Covers the marked e4 pawn.
(ii) Sets up for kingside relocation
(Nd2-f1-g3-f5/h5)
11 Ng5
11 a4
11 Bg5
11 a3
11 dxe5
11 d5
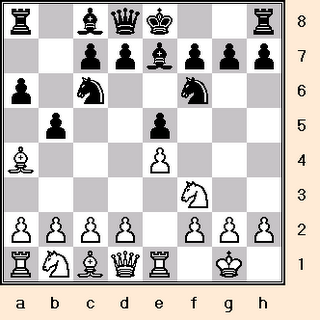
11 ... Bf8
That's one less piece between the e8 rook
and the targetted e4 pawn.
11 ... h6
11 ... g6
12 a4
The idea is to activate the a1 rook via
the a-file (Ra1-a3 followed by a sideways
maneuver along the third rank).
12 Ng5
12 d5
12 Bc2
12 a3
12 Nf1? exd4 13.cxd4 Na5 and Black has an excellent game.
(13 ... Rxe4?! is met by 14 Bxf7+ (idea: 14 ... Kxf7 15 Ng5+)
and 13 ... Nxe4? is met by 14 Rxe4! Rxe4 15 Ng5 Re7 16 Qh5).
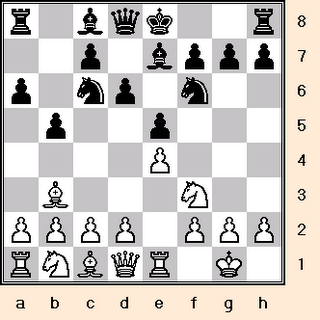
12 ... h6

Preventing Ng5. If the knight were to get there,
it would work with the b3 bishop to harass the
f7 pawn.
12 ... Qd7
12 ... exd4
12 ... g6
12 ... Na5
12 ... Nb8
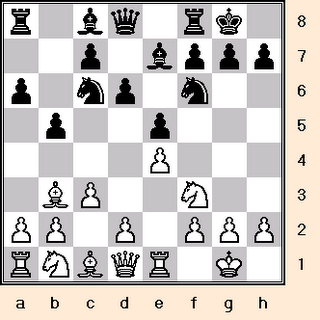
13 Bc2
(i) Extra protection for the targetted e4 pawn.
(ii) Surveillance of Black's kingside along b1-h7.
13 d5
13 Ba2
13 dxe5
13 axb5
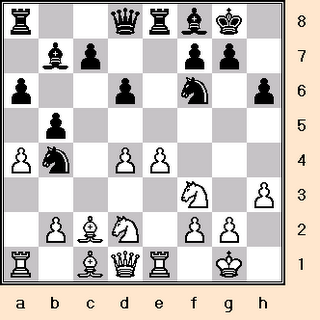
13 ... exd4

(i) Exposes e4 to the e8 rook's fire.
(ii) Enables a queenside attack. After 14 cxd4,
Black can develop the c6 knight to b4 in order
to facilitate ... c7-c5.
13 ... Nb8
13 ... Qd7
13 ... Rb8
13 ... g6
13 ... b4
14 cxd4

14 Nxd4
14 ... Nb4
14 ... Qd7
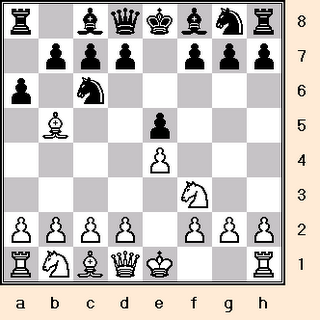
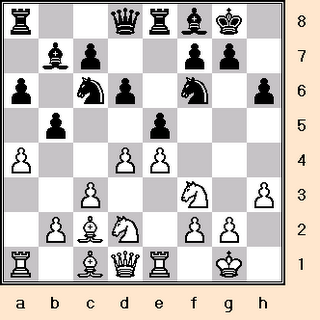
15 Bb1

15 ... c5

Mobilizing the queenside.
15 ... bxa4
15 ... g6
15 ... Qd7
15 ... Nd7
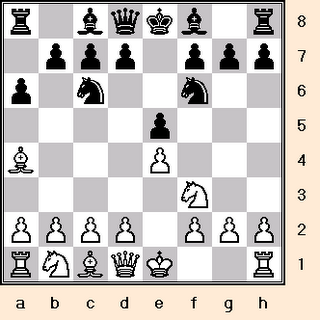
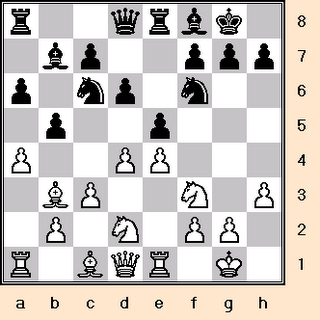
16 d5
Blocking the bishop's view of e4.
16 b3
16 dxc5
16 Ra3
16 ... Nd7

(i) Makes way for an ... f7-f5 attack against e4.
(iii) Readies the knight for queenside or kingside
action.
16 ... g6
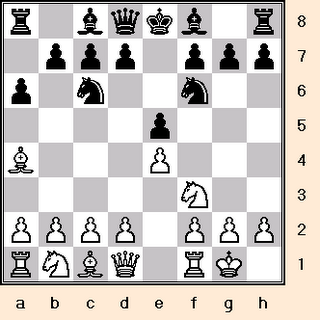
17 Ra3

The first step in activating the rook. When the time
is ripe, White will move it along the third rank toward
the center or kingside.
17 Nf1
Black can now choose between:
17 ... c4

Furthering the queenside attack.
and
17 ... f5
Progressing with the destabilization of e4.
By ChessCoach@care2.com
6 Re1 b5 7 Bb3 d6 8 c3 O-O 9 h3 Bb7 10 d4 Re8
11 Nbd2 Bf8 12 a4 h6 13 Bc2 exd4 14 cxd4 Nb4
15 Bb1 c5 16 d5 Nd7 17 Ra3 f5 Line

What's the game plan for Black?
Black aims to undermine e4 and also conduct
a queenside attack.
What's the game plan for White?
White intends to fortify e4 and also direct his
forces towards Black's kingside.
Also available:
Chess: Understanding the Closed Ruy Lopez
http://chesscoach1950.blogspot.com/2006/01/chess-understanding-closed-ruy-lopez.html.
Chess: Understanding the Ruy Lopez (Open Variation)
http://chesscoach1950.blogspot.com/2006/05/chess-understanding-ruy-lopez-open.html
Chess: Understanding the Ruy Lopez
(Schliemann Defense)
http://chesscoach1950.blogspot.com/2006/08/chess-understanding-ruy-lopez.html
1 e4
Opening up a diagonal for the Queen and f1 bishop, and,
attacking the d5 and f5 squares.
1 ... e5
Black copies White with the same idea in mind.
2 Nf3
Not merely bringing the knight nearer the
center of operations but also assailing Black's
e5 pawn. If possible, always develop with attack
so as to speed up mobilization and harass the
enemy.
2 ... Nc6
The knight comes out to protect the threatened pawn.
3 Bb5

Inaugurating the Ruy Lopez. White indirectly
attacks Black's e5 pawn by threatening to
remove its defender (Bxc6). Moreover, he
prepares for a rapid kingside castling and
dissuades the advancement of the d7 pawn
because of the prospective pin on the knight.
3 ... a6
So that, when the bishop retreats to a4, he can hold in
reserve the possibility of driving it back altogether by
... b5.
3 ... Nf6
3 ... f5
3 ... g6
3 ... Bc5
3 ... Nd4
3 ... Nge7
3 ... d6
3 ... Bb4
3 ... Be7
3 ... d5
3 ... a5
3 ... Qe7
3 ... Qf6
3 ... Nb8
3 ... Na5
3 ... g5
3 ... Bd6
3 ... f6
3 ... Nce7
3 ... a6 (Closed Ruy Lopez)
3 ... a6 (Open Ruy Lopez Part I)
3 ... a6 (Open Ruy Lopez Part II)
3 ... a6 (Marshall Gambit)
4 Ba4

4 Bc4
4 Be2
4 Bd3
4 Bxc6
White cannot as yet win the e5 pawn by 4 Bxc6 dxc6
5 Nxe5 because of 5 ... Qd4, doubly attacking
White's e5 knight and e4 pawn. Consequently, White
retires his bishop to a4, and waits for a more
propitious moment to effect the exchange.
4 ... Nf6
Developing the knight and counter-attacking White's
e4 pawn.
4 ... d6
4 ... b5
4 ... f5
4 ... Nge7
4 ... g6
4 ... Be7
4 ... Bc5
4 ... Qf6
4 ... Nd4
4 ... g5
4 ... f6
4 ... Bb4
5 0-0
White, however, can also ignore this attack.
5 Qe2
5 d4
5 d3
5 Nc3
5 Bxc6
5 c3
5 ... Be7
5 ... Nxe4
5 ... b5
5 ... Bc5
5 ... d6
5 ... Bd6
6 Re1
White now threatens to play 7 Bxc6 dxc6 8 Nxe5,
when 8 ... Qd4 will no longer work because of
9 Nf3.
6 Bxc6
6 Qe2
6 d3
6 d4
6 Nc3
6 c3
6 c4
6 ... b5

Eliminating the aforementioned threat.
6 ... d6
6 ... O-O
6 ... Bc5
7 Bb3
Moving out of harm's way.
7 ... d6
Protecting the e5 pawn, which is an important piece in
maintaining Black's central position, and, opening up a
diagonal for the c8 bishop.
7 ... O-O
7 ... Bb7
8 c3
Preparing to build up a pawn center by d4 and giving
the b3 bishop a square of retreat on c2.
8 a4
8 h3
8 a3
8 d4
8 Nc3
8 d3
8 Bd5
8 ... 0-0

Black prudently removes his King from the center
and places it in a safer position. Not commendable
is 8 ... Bg4 because of 9 d3, when White will
eventually win a tempo with the maneuver
Ncd2-f1-e3/g3 followed by h3. Inferior is
9 h3 Bh5 10 d3 Qd7, when Black may strike at the
pawn on h3.
8 ... Na5
8 ... Bg4
8 ... Nb8
9 h3
Preventing Bg4, which is what Black would do if
White played 9 d4 at once.
9 d4
9 d3
9 a4
9 a3
9 Bc2
9 ... Bb7
Inaugurating the Flohr-Zaitsev Variation
of the Closed Ruy Lopez. This fianchetto
hints at Black's design to undermine e4.
10 d4
(i) Facilitating the development of the
c1 bishop along the c1-h6 diagonal.
(ii) Vying for e5 and c5.
(iii) Reserving the possibility to lock
the center via d4-d5.
Although 10 d3 is not uncommon, it isn't
as assertive as the text.
10...Re8
Black continues to mind the e4 pawn in an indirect
manner.
Other moves to consider are:
10 ... Na5 11 Bc2 c5 12 Nbd2 cxd4 13 cxd4 Qc7 14 d5 Rac8
15 Bd3 Nd7 16 Nf1 f5.
(i) Open up the c-file in order to pressurize it
(12 ... cxd4, 13 ... Qc7, 14 ... Rac8).
(ii) Undermine the d5 pawn by attacking its e4 counterpart
(16 ... f5).
10 ... Nd7 11 Nbd2 Bf6 12 Nf1 Re8 13 Ng3 g6 14 Bh6 Na5
15 Bc2 c5 16 d5 Nc4 17 Qc1 Bg7 18 a4 Ncb6 19 a5 Nc8 20 c4 Bxh6 21 Qxh6.
(i) Artificially fianchetto the e7 bishop so as to beef up the kingside (10 ... Nd7, 11 ... Bf6, 13 ... g6, 17 ... Bg7).
(ii) Initiate queenside action
(14 ... Na5, 15 ... c5, 16 ... Nc4, 17 ... Ncb6)
(iii) Attack White's center by executing a timely ... f7-f5.
10 ... Qd7 11 Nbd2 Rad8 12 d5 Nb8 13 Nf1 c6 14 dxc6 Bxc6
15 Ng3 Qb7 16 Qe2 Nbd7 17 Bc2 Rfe8 18 Nf5 Bf8 19 Nh2 d5.
(i) Pressurize d5 and then aim for a d6-d5 break
(10 ... Qd7, 11 ... Rad8, 13 ... c6, 14 ... Bxc6, 15 ... Qb7,
19 ... d5)
(ii) Provide the e7 bishop with a retreat square on f8 (17 .... Rfe8).
10 ... h6 11 Nbd2 Re8 12 a4 Bf8 13 Bc2 exd4 14 cxd4 Nb4
15 Bb1 c5 16 d5 Nd7 17 Ra3 f5.
10 ... Nb8 11 dxe5 dxe5 12 Qxd8 Bxd8 13 Nxe5 Nxe4 14 Be3 Bf6
15 Ng4 Nd7 16 Nd2 Nxd2 17 Bxd2 Rfe8 18 Bf4.
10 ... Rc8 11 Nbd2 exd4 12 cxd4 Nb4 13 Qe2 c5 14 a3 Nc6 15 dxc5 dxc5 16 e5 Nd5.
11 Nbd2
(i) Covers the marked e4 pawn.
(ii) Sets up for kingside relocation
(Nd2-f1-g3-f5/h5)
11 Ng5
11 a4
11 Bg5
11 a3
11 dxe5
11 d5
11 ... Bf8

That's one less piece between the e8 rook
and the targetted e4 pawn.
11 ... h6
11 ... g6
12 a4
The idea is to activate the a1 rook via
the a-file (Ra1-a3 followed by a sideways
maneuver along the third rank).
12 Ng5
12 d5
12 Bc2
12 a3
12 Nf1? exd4 13.cxd4 Na5 and Black has an excellent game.
(13 ... Rxe4?! is met by 14 Bxf7+ (idea: 14 ... Kxf7 15 Ng5+)
and 13 ... Nxe4? is met by 14 Rxe4! Rxe4 15 Ng5 Re7 16 Qh5).
12 ... h6

Preventing Ng5. If the knight were to get there,
it would work with the b3 bishop to harass the
f7 pawn.
12 ... Qd7
12 ... exd4
12 ... g6
12 ... Na5
12 ... Nb8
13 Bc2
(i) Extra protection for the targetted e4 pawn.
(ii) Surveillance of Black's kingside along b1-h7.
13 d5
13 Ba2
13 dxe5
13 axb5
13 ... exd4
(i) Exposes e4 to the e8 rook's fire.
(ii) Enables a queenside attack. After 14 cxd4,
Black can develop the c6 knight to b4 in order
to facilitate ... c7-c5.
13 ... Nb8
13 ... Qd7
13 ... Rb8
13 ... g6
13 ... b4
14 cxd4

14 Nxd4
14 ... Nb4
14 ... Qd7
15 Bb1

15 ... c5

Mobilizing the queenside.
15 ... bxa4
15 ... g6
15 ... Qd7
15 ... Nd7
16 d5

Blocking the bishop's view of e4.
16 b3
16 dxc5
16 Ra3
16 ... Nd7
(i) Makes way for an ... f7-f5 attack against e4.
(iii) Readies the knight for queenside or kingside
action.
16 ... g6
17 Ra3
The first step in activating the rook. When the time
is ripe, White will move it along the third rank toward
the center or kingside.
17 Nf1
Black can now choose between:
17 ... c4
Furthering the queenside attack.
and
17 ... f5
Progressing with the destabilization of e4.
By ChessCoach@care2.com
posted by ChessCoach1977 at 7:49 PM
![]()
![]()

0 Comments:
Post a Comment
<< Home